Geometry decides more fights than dice do. This page covers the four positional layers; range (how far you can hit), cover (what's between you and the round), flanking (the squeeze), and crossfire (the pinch). Each one shifts the dice in the attacker's or defender's favour.
Range and Distance
Cybercore uses a tactical grid where 1 hex = 2 metres (or 1 square = 2 metres if using a square grid; see Movement). When you make a ranged attack, the distance to your target determines which Range Band you're firing in, and that band applies a modifier to the target's TL.
Every ranged weapon has a Range Increment; a distance in metres listed on the weapon's stat line. The four Range Bands are multiples of that increment:
| Band | Distance | TL Modifier |
|---|---|---|
| Point Blank | 0 to 1× increment | -5 |
| Short | 1× to 2× increment | 0 |
| Medium | 2× to 3× increment | +5 |
| Long | 3× to 4× increment | +10 |
Beyond 4× the weapon's Range Increment, the target is out of range and cannot be hit.
The TL modifier adjusts the target's effective TL for that attack. A pistol at Point Blank is easier to land (-5 TL). The same pistol at Long range is considerably harder (+10 TL). Choose your weapon for the engagement, or close the distance.
Standard Range Increments
Each weapon lists its own Range Increment, but the following are the standard values by weapon class:
| Weapon Class | Increment | Squares | Point Blank | Short | Medium | Long (Max) |
|---|---|---|---|---|---|---|
| Small (pistol) | 10m | 5 sq | 0–10m (0–5 sq) | 10–20m (5–10 sq) | 20–30m (10–15 sq) | 30–40m (15–20 sq) |
| Shotgun | 8m | 4 sq | 0–8m (0–4 sq) | 8–16m (4–8 sq) | 16–24m (8–12 sq) | 24–32m (12–16 sq) |
| Medium (rifle) | 20m | 10 sq | 0–20m (0–10 sq) | 20–40m (10–20 sq) | 40–60m (20–30 sq) | 60–80m (30–40 sq) |
| Assault | 30m | 15 sq | 0–30m (0–15 sq) | 30–60m (15–30 sq) | 60–90m (30–45 sq) | 90–120m (45–60 sq) |
| Heavy | 40m | 20 sq | 0–40m (0–20 sq) | 40–80m (20–40 sq) | 80–120m (40–60 sq) | 120–160m (60–80 sq) |
Thrown weapons do not use this table. Thrown range scales with the thrower's Might and the item's size; see Thrown Weapon Range below.
Vex draws her sidearm (Small, 10m increment) and fires at a Zod Raider 25m away. That's between 2× (20m) and 3× (30m) her increment; Medium range. The Raider's TL 12 becomes an effective TL 17 for this shot.
Meanwhile, Kade shoulders his rifle (Medium, 20m increment). At 25m, he's between 1× (20m) and 2× (40m); Short range. No modifier. Same target, same distance, but the right tool for the job.
Thrown Weapon Range
"A knife throws further than a brick. Physics has opinions about your forearm."; UNI-NAV combat instructor, pre-tribunal
Thrown weapons don't read off the standard Range Increment table. Your reach comes from Heft, what your shoulder can actually do, multiplied by what you're throwing, divided by how much the local gravity wants to argue.
Heft
Heft is your throwing rating, raw Might compressed onto a 1-to-5 scale so a Bovarian peak doesn't end up tossing knives over the event horizon. Halve your Might, round up. Most pit-fighters sit at Heft 2 or 3. Bovarian dockhands clock Heft 5, which is somthing you do not want to be on the receiving end of.
Formally: Heft = ⌈Might ÷ 2⌉.
| Might | Heft |
|---|---|
| 1–2 | 1 |
| 3–4 | 2 |
| 5–6 | 3 |
| 7–8 | 4 |
| 9–10 | 5 |
Size and the Sweet Spot
A throwing knife outdistances a sledgehammer for the same reason a paper aeroplane outdistances a brick: mass costs reach, reach costs grace, and the middle is Small; heavy enough to carry through air, light enough to launch. Knives, darts, throwing disks, the entire wrist-and-go catalogue lives in this band.
Tiny items get eaten by wind drag; paperclips do not assassinate people. Medium carries mass at the cost of arc. Large is for chopping; you can still throw it, you'll just be re-introduced to it shortly afterwards.
Your throw works in bands of distance equal to Heft × Step, with Step set by item size. A Small item's Step is 8 metres per Heft, so a Heft 3 thrower works in 24-metre bands; roughly the length of a CONFED light cruiser corridor, and not coincidentally the range every CONFED knife instructor trains to.
| Size | Step (per Heft) | Squares | Ratio to Small |
|---|---|---|---|
| Tiny | 6m | 3 sq | ¾ |
| Small | 8m | 4 sq | 1 (base) |
| Medium | 4m | 2 sq | ½ |
| Large | 2m | 1 sq | ¼ |
Band size = Heft × Step × Gravity Multiplier.
The Ladder
The first band is clean. Past that, every band you push through stacks Disadvantage. One band out: Disadvantage. Two: Disadvantage-3. Three: Disadvantage-4, the cap. Push for a fourth and the system finally tells you no. The knife doesn't reach. You watched it not reach. So did everyone else.
| Band | Distance | Penalty |
|---|---|---|
| Clean | 0 → 1× band size | None |
| Band 1 | 1× → 2× band size | Disadvantage (2 dice) |
| Band 2 | 2× → 3× band size | Disadvantage-3 (3 dice) |
| Band 3 (max) | 3× → 4× band size | Disadvantage-4 (4 dice; cap) |
| Beyond | > 4× band size | Out of range; cannot throw |
There is no Disadvantage-5. The dice rules cap stacking at 4 dice (see Advantage and Disadvantage) and that cap doesn't bend for thrown weapons; If a target's outside four bands you're not throwing a knife at them, you're picking up a rifle or closing the gap.
Gravity
The numbers above assume Standard Gravity, the polite fiction CONFED prints on its training manuals. The field is rarely Standard.
Half gravity doubles every distance you can throw. Microgravity quadruples it; a Heft 5 thrower on a derelict can land an edge past six hundred metres, which is the entire reason Bovarian salvage crews don't sit down in zero-G. Climb to 2G and your throws halve. Climb to 3G and you keep a quarter; at that point you're not throwing weapons, you're handing them to someone with better posture.
| Environment | Distance Multiplier |
|---|---|
| 0G (microgravity) | ×4 |
| 0.5G (low gravity) | ×2 |
| 1G (Standard) | ×1 |
| 2G (high gravity) | ×½ |
| 3G+ (crushing) | ×¼ |
Max throwable distance by size and Heft, Standard Gravity; max = 4 × Step × Heft × Gravity Multiplier:
| Size | Heft 1 (Might 1–2) | Heft 2 (Might 3–4) | Heft 3 (Might 5–6) | Heft 4 (Might 7–8) | Heft 5 (Might 9–10) |
|---|---|---|---|---|---|
| Tiny | 24m | 48m | 72m | 96m | 120m |
| Small | 32m | 64m | 96m | 128m | 160m |
| Medium | 16m | 32m | 48m | 64m | 80m |
| Large | 8m | 16m | 24m | 32m | 40m |
Scope
Thrown weapons only. Slug throwers, blasters, lasers, and shoulder-fired launchers use the Standard Range Increment table above. Grenades, flashbangs, gas canisters and any other listed Explosive are hand-thrown but read range off their own stat line; the explosives logistics chain didn't agree to the Heft model and never will. Gravity bends throws; it doesn't bend bullets, photons, or the cargo manifest of a rocket launcher.
Rook (Might 5; Heft 3) palms a Small throwing knife at Standard Gravity. Band size 24m. Clean to 24m, Disadvantage to 48m, Disadvantage-3 to 72m, the Disadvantage-4 cap at 72–96m. Past 96m the knife stops being his problem and starts being gravity's.
Brak the Bovarian (Might 10; Heft 5) picks up the same knife. Band size 40m. Cap reached at 120–160m. Bovarians are why javelins are still in production.
Brak in 0G, derelict freighter, no spin, the lights are out, gets ×4 on every distance: clean to 160m, cap at 480–640m. A knife. Across half a kilometre. The Bovarian shrugs.
Vex (Might 3, Heft 2) tries with a Large adze (2m Step) at Standard Gravity. Band size 4m. Clean to 4m, cap at 12–16m, nothing beyond 16m. The adze is for chopping, not throwing. In 2G her cap halves to 8m, she just hands it to Brak.
Quick Reference: Small Item, Standard Gravity
A combined band-by-band lookup for the most common case (Small item, 8m Step per Heft, 1G):
| Might | Heft | Clean | Disadvantage | Disadvantage-3 | Disadvantage-4; MAX | Out of range |
|---|---|---|---|---|---|---|
| 1–2 | 1 | 0–8m | 8–16m | 16–24m | 24–32m | 32m+ |
| 3–4 | 2 | 0–16m | 16–32m | 32–48m | 48–64m | 64m+ |
| 5–6 | 3 | 0–24m | 24–48m | 48–72m | 72–96m | 96m+ |
| 7–8 | 4 | 0–32m | 32–64m | 64–96m | 96–128m | 128m+ |
| 9–10 | 5 | 0–40m | 40–80m | 80–120m | 120–160m | 160m+ |
Melee Range
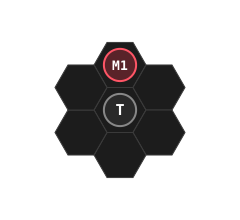
Melee weapons and unarmed attacks require the attacker to be adjacent; within 1 square (2m) of the target. Melee attacks do not use Range Bands or TL modifiers for distance.
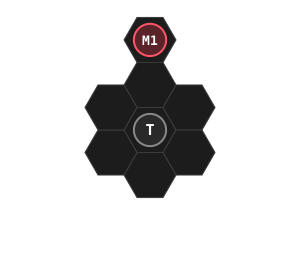
Some melee weapons have the reach(N) tag, extending their engagement distance to N hexes. A reach(2) polearm engages at 2 hexes, a reach(3) whip at 3.
MR-1 · Adjacent
MR-2 · Plain melee at range 2
MR-3 · reach(2) polearm at 2
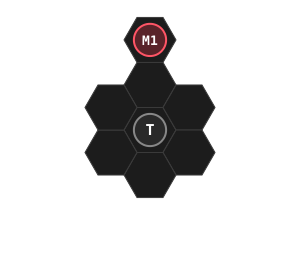
reach(2) weapon tag extends the engagement to 2 hexes.MR-4 · reach(3) whip at 3
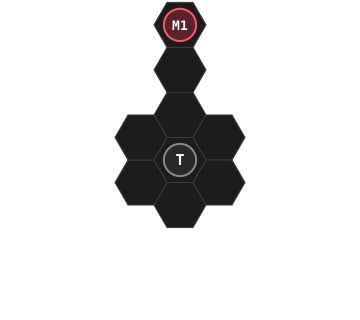
reach(3) engages all the way out to 3 hexes.Ranged Weapons in Melee
Firing a ranged weapon at a target within melee range (adjacent, 1 square / 2m) imposes Disadvantage on the attack roll. You're trying to aim a weapon while someone is close enough to grab it, shove you, or put a blade through your ribs; accuracy suffers.
This applies to all ranged weapons unless an ability or skill states otherwise. Certain skills, such as Close Quarters Training (Small weapons), remove this penalty entirely.
Heavy Weapon Minimum Range
Heavy weapons are designed for sustained fire at distance. Up close, they are unwieldy and difficult to bring to bear on a moving target.
Heavy weapons suffer a graduated minimum-range penalty that tapers off as the target moves further from the gunner:
| Distance from gunner | Penalty |
|---|---|
| 1 hex (adjacent) | Disadvantage-3 (4 dice take lowest) |
| 2 hexes | Disadvantage-2 (3 dice take lowest) |
| 3 hexes | Disadvantage-1 (Disadvantage, 2 dice take lowest) |
| Beyond 3 hexes | Normal — no penalty |
A mounted M134 Minigun (Heavy) has a Zod warrior in its face — 1 hex away. The gunner is on Disadvantage-3 (rolls 4 dice, keep lowest). The Zod backs off to 2 hexes the next round; penalty drops to Disadvantage-2 (3 dice). At 3 hexes the gunner is on Disadvantage-1. At 4 hexes and beyond, the chaingun is back in its element and the rolls are clean.
Heavy weapon minimum range
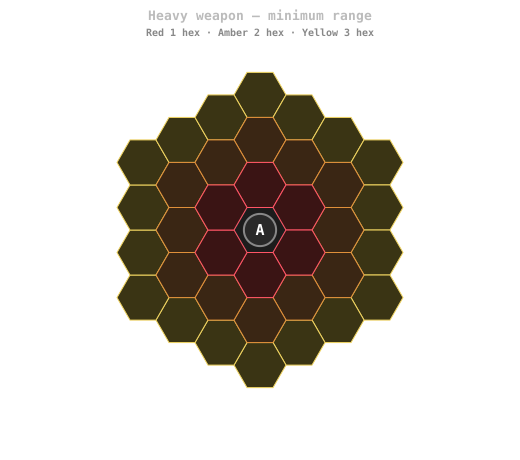
Certain abilities, such as the Heavy core's Close Quarters Specialist, can reduce or halve these minimum range penalties.
Machine Gun Range Reversal
Machine guns, belt-fed, tripod-mounted, and designed for volume of fire, are notoriously difficult to swing onto close, dodging targets. When using a machine gun, reverse the Range Band TL modifiers:
| Band | Standard Weapon | Machine Gun |
|---|---|---|
| Point Blank | -5 (easiest) | +10 (hardest) |
| Short | 0 | +5 |
| Medium | +5 | 0 |
| Long | +10 (hardest) | -5 (easiest) |
This reversal stacks with the Heavy Weapon Minimum Range penalty where applicable.
Ability Ranges
Some abilities reference Range Bands directly (e.g. "within Short range" or "within Medium range") rather than a specific distance in metres. When an ability uses a Range Band name, use the following standard distances:
| Band | Distance |
|---|---|
| Melee | 2m (adjacent, 1 square) |
| Point Blank | 10m (5 squares) |
| Short | 30m (15 squares) |
| Medium | 60m (30 squares) |
| Long | 120m (60 squares) |
These are the maximum distances for each band and are used when an ability does not specify a weapon increment.
Cover
Cover is the concrete layer; the 344-gallon drum, the steel console, the blast door you put between yourself and the incoming round. It is not Concealed (a visual state that shifts the dice). Cover grants flat DR.
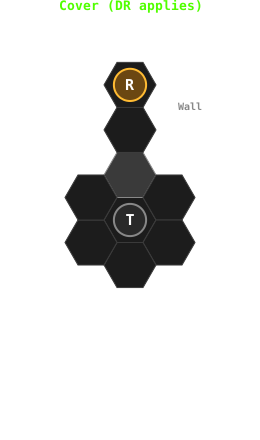
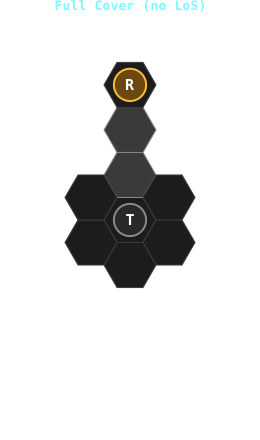
There are three cover states: No Cover, Cover (1–5), and Full Cover.
| Cover State | Effect |
|---|---|
| No Cover | You're in the open. No protection. |
| Cover (1–5) | Cover has a level. Each level grants +2 DR against incoming attacks (Cover 1 = +2, up to Cover 5 = +10). The cover must be between you and the attacker. This DR stacks on top of your armour DR. |
| Full Cover | Cannot be targeted by attacks requiring line of sight. Protects against volumetric explosions and area effects. |
The cover level is set by the material you're hiding behind. Each step up the ladder is another +2 DR:
| Cover Level | DR | Material | Examples |
|---|---|---|---|
| 1 | +2 | Light (soft/thin) | Ration crates, furniture, plastic partitions |
| 2 | +4 | Medium (solid) | Steel consoles, machinery housings, lockers |
| 3 | +6 | Heavy (reinforced) | Blast doors, structural columns |
| 4 | +8 | Armoured (military) | Bunker walls, hull plating |
| 5 | +10 | Fortified emplacement | Reactor housing, vault doors, dug-in positions |
Cover can be destroyed by demolitions and heavy weapons. When cover is destroyed, anyone behind it is in the open. For cover placement and map symbols, see Mission Design; Cover.
Cover vs Concealed. Cover is concrete and grants DR; Concealed is visual and shifts the dice (Advantage/Disadvantage). A target can have one, the other, or both: a soldier dug in behind a blast door in a smoke cloud has Cover 3 (+6 DR) and is Concealed.
No Cover
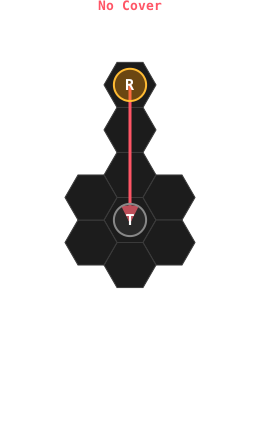
Cover (DR applies)
Full Cover (no LoS)
Flanking; The Bracket
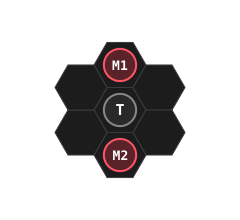
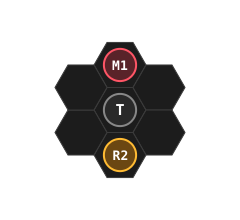
Two operators on opposite faces of the mark, both close. Whichever way the mark turns to address one threat, the other side opens. Attention runs out before the geometry does. A sidearm in either operator's hand collapses the picture; they're tracking muzzle past a friendly instead of working the bracket, so the bonus stays in the manual.
- Each attacker is within their weapon's melee reach of the target; plain melee = adjacent (1 hex); polearms / whips / etc. tagged
reach(N)can engage at up to N hexes. - Both wielding melee weapons. A ranged weapon in hand, even at point-blank, disqualifies that combatant from contributing to the flank.
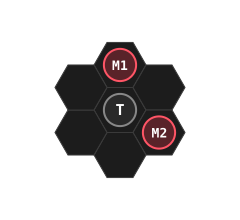
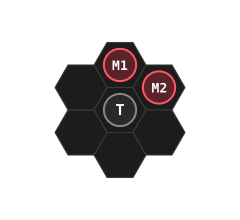
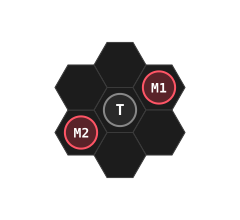
- The two attackers' bearings around the target are ≥ 120° apart (i.e. not on the same flank face).
- The target must be on a hostile or unfriendly faction relative to the attackers. Friendly / Allies targets can't be flanked.
- Bonus: each qualifying melee attacker rolls with
Advantage(1)against the flanked target.
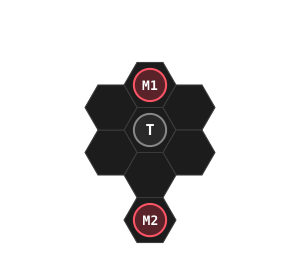
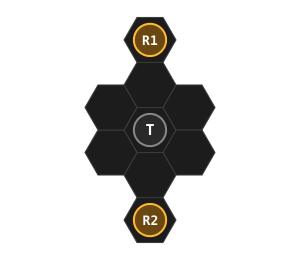
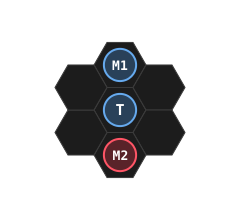
On a flat-top hex grid. M1 / M2 are hostile melee attackers.
R1 / R2 hostile ranged attackers.
T is the target. Blue tokens are friendly to T (same faction).
F-1 · 180° opposite
F-2 · 120° skip
F-3 · 60° adjacent
F-4 · 180° across (NE + SW)
F-5 · One melee + one ranged
F-6 · Plain melee at range 2
reach(2) and the same picture flanks — see F-9.F-7 · Two ranged at range
F-8 · Allied attacker on friendly T
F-9 · Reach gap-flank
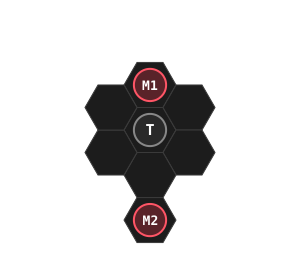
reach(2). Same geometry as F-6 but the weapon tag turns it into a flank.Reach and the Bracket
Reach is a per-weapon tag on melee weapons: reach(2) for a combat staff or stun glaive, reach(3) for a electro whip or stunwire. A bare reach tag with no number is treated as reach(2). Ranged weapons never use reach; they have their own range.
A reach(2) shockrod at range 2 + a plain melee adjacent on the opposite side = flank.
Crossfire; Pinch The Lane
Two shooters, opposite arcs, geometry doing the work. The mark can't address one without showing flank to the other; the threat-model can't resolve. Only works at distance, though. Crowd inside arm's reach and you're a body in the contact instead of an angle on it, and the lane stops including your shot.
- Both attackers at range from the target (≥ 2 hexes). Adjacent ranged = in melee → no contribution.
- Both wielding ranged weapons (slug, laser, blaster, thrown, explosive, exotic; anything not
weaponType: "melee"). - The first qualifying RANGED hit on the target opens the crossfire window (visible as the
Crossfiredstatus). - The second qualifying attacker must be on the OPPOSING front/back half OR OPPOSING left/right half of the target's facing (default viewAngle 210° → front cone 105° each side).
- Bonus: the second attacker rolls
Advantage(1). Window clears on the target's next turn-start. - If a buddy is opposite in melee, you LOSE crossfire; you'd be aiming through them.
The green arrow on T marks the target's facing.
X-1 · Front + back at range
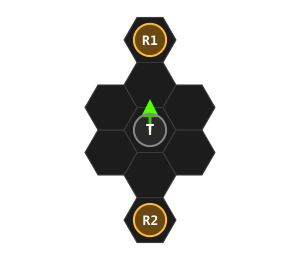
X-2 · NW + SE diagonals
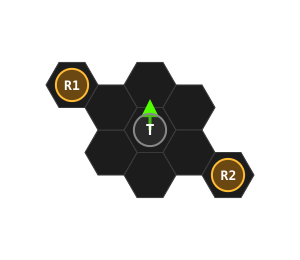
X-3 · L/R split in front cone
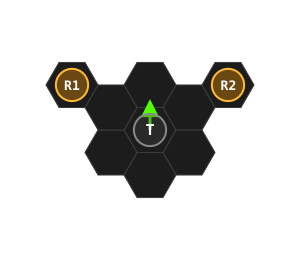
X-4 · Same side at range
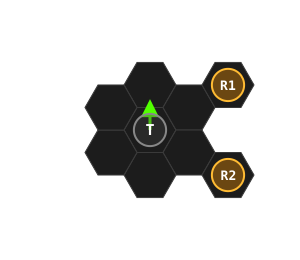
X-5 · One adjacent + one at range
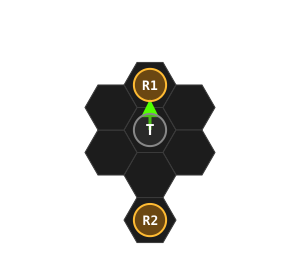
X-6 · Both adjacent (point-blank)
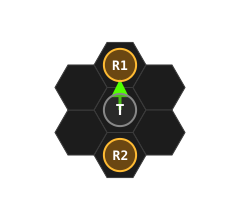
X-7 · Ranged + melee opposite
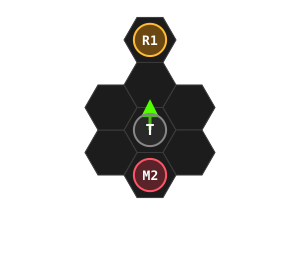
No-Bonus Edge: Ranged In Melee
Sidearm out at close range with an ally on the far side of the contact: neither bonus applies. You're holding the muzzle off the friendly instead of contributing to a bracket. You're inside the engagement instead of running it from the perimeter, so there's no crossfire arc to be on. Bonuses go to combatants doing the job their weapon was made for, at the range it was made for.
Faction note; combat positional bonuses require the target to be on a Hostile or Unfriendly faction relative to you. The full faction ladder (Hostile / Unfriendly / Neutral / Friendly / Allies) is tracked in GH #11. Until it ships, every Character actor lives in faction Squad and every Creature in faction Creatures; the two are hostile to each other.
Related Systems
- Attacks; the attack roll bonuses that Cover & Positioning modify
- Damage & Defences; Cover DR stacks on top of Armour DR
- Movement; Run-or-Move to close distance / get behind cover
- Areas & Distance; AoE templates ignore most cover
- Grappling; the close-quarters end of positioning